Posts Tagged ‘tech’

h1

Another Day of Battery Life

December 16, 2014

To make a ring, I needed to minimize everything. Of course, if you’ve seen the picture, you already know I didn’t actually minimize much.

Still, batteries in wearables are a pain. For this wearable with my “you have to take it apart to charge it” methodology, well, longer battery life means this hack will exist longer. The more I take it apart, the more like it is that I’ll repurpose the parts to do something else. (I have this idea for a different ring…)

Minimizing power in Arduino is a topic that has been taken on by plenty of other people. And I happily reused their code and methods(Thank, you Nick Gammon!).

However, when planning a device, it is helpful to determine the size of battery you need. To that end, I made an Excel sheet (sorry, I default there) which I’ve put into a Google spreadsheet so you can see it with the math. The first sheet (words) describes the process in words. The second sheet (numbers) reflects the same information but with numbers. You fill in the orange boxes, it generates the green one.

The first step is to determine the different power states of the device. For Wordy, it is either on (display showing) or sleeping (Arduino asleep, accelerometer configured to wake and interrupt it).


My next step was to figure out how much time the system would spend in each of these states. My goal is for the ring to be on for about five seconds every five minutes. Sometimes it will be on more, as I play with it a lot. More often it will be sleeping, such as left on a table overnight. (Note: if you build a Wordy, I strongly recommend setting the ring so it will lose at Pong. Sometimes if you leave it on the X side with no Y tilt, the ring will play Pong by itself indefinitely.) Starting with the idea of five seconds per five minutes means I’ll probably be on the conservative side (unless it plays a Pong marathon without me).

Next, I measured how much current each state. I used my shiny new DVM-with-current-sensing (my old one didn’t have that (though it did have a more melodious beep in resistance mode)). You can use a resistor if you feel like doing it old school style.

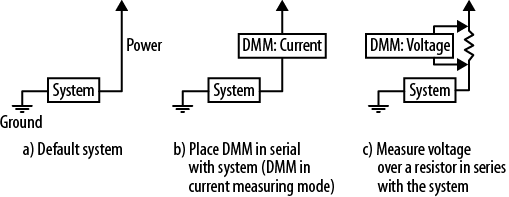
(This pic is from my book. If you were unaware I wrote a book, well, yes, I did and it is full of jokes. And dinosaurs. But mostly embedded systems.)

Finally, I calculated how long the device would last given a 40mAh battery (the largest I was willing to use due to size constraints). The result turned out to be much greater than I expected.

This does not have to be the order of events: you might start with the idea of how long you want the device to last and choose the battery accordingly. Or you may have a fixed battery and a predetermined life and need to determine how much time you can spend in each state. Happily, the math works in all the different ways.

Note that this value I got was greatly in excess of my self-imposed goal (which was a puny two hours). It is also greatly in excess of what I said in the build instructions (which was 48 hours). My wear-time was even greater than the estimated value: I charged on Tuesday afternoon and it died on Saturday night.

Though, I’m pretty sure I can do better than these power numbers.

When I measured the MicroView without the accelerometer, the on-state power fluctuated between 10mA and 14mA, depending on how much of the screen was lit. (All current measurements were taken around 3.7V.) If I modify numbers on the spreadsheet, the on-state power of 10mA to 14mA, it changes from 3.5 days to 3.1 days. I switched it back to 12mA as reasonable middle ground.

The accelerometer doesn’t add much to this on-state value. On the other hand, for the sleep-state power, it is a very different situation. The MicroView alone took 0.14mA. The MicroView and accelerometer together take 0.31mA. If I change the sleep-state power from 0.31mA to 0.14mA, the amount of battery life expected changes from 3.2 days to 4.9 days.

The accelerometer datasheet says the accelerometer’s current consumption is 6uA to 165uA. Looking at the numbers above (0.31mA-0.14mA = 0.17mA ~= 165uA), it is clear I should be able to reduce the sleep-state power by reading over the accelerometer datasheet again. (There is also an application note about wake/sleep features.)

Skimming through the app note, I don’t care too much about the precision of the data (though I might in Pong mode but that is an active mode so it is ok to use more power there). It would be no problem to turn the system from 14-bit mode to 8-bit mode.

Sleep mode is limited to 50Hz sampling but that is what I’m sampling at anyway. Why am I still seeing the max current?

Ahh, according to the oversampling chart, I may see 165uA due to high resolution sampling. I can go to 24uA with normal sampling or 14uA with low power. However, I want some filtering either through oversampling or via the low noise setting. The combination of low noise + low power is back to 24uA.

Making only one change (from high resolution to normal sampling) should be enough to increase my battery life from 3.3 days to 4.6 days. That’s exciting. Excuse me, I need to go see if that’ll work and what else I need to change.

[Note: this was crossposted from Wordy’s Hackaday page project log.]

h1

Circle clockwise three times

August 14, 2014

I mentioned that I’m working on a Raspberry Pi project with video. It wasn’t going well.

I started with Python + SimpleCV because it looked easy and fun but then determined that frame rates of six frames per second would make it hard to show moving things. So I went a more native option: cross compiled C with OpenCV.

The problem with this path is that it feels like work.

While I strongly believe in life outside tech, I do some personal engineering-related projects. I consider the podcast my main personal project. But Element 14 has graciously been sending me hardware and the occasional check to write for them. This arrangement lets me learn new things and share my enthusiasm. It is pretty cool (zOMG, you guys, they pay me to goof off! If I whine enough, they send me even neater hardware! This is such a scam!)

But I do have a day job. Oh, don’t get me wrong, my billable hours are not totaling anywhere near 40. But I could be gardening, reading a book, writing a novel, designing my Halloween costume, or painting the ceiling; I could be doing other amusing things but I’ve opted to work on a technical project because I find it interesting. Getting paid is nice and directs my (often scattered) attention but it is not a large portion of my income (thus it is not motivation enough).

Having a project lose the joy of discovery and become a grind is not good for its prospects of completion. (Though I am excited about the end widget. But maybe it would be easier to do on my laptop. But then it isn’t embedded. Maybe there is an 8-bit microcontroller out there that needs me to do something with it. You know, my Halloween costume is likely to be pretty technical…)

Doing a project in Python on the Raspberry Pi is fun: hack it together, do a little experimentation, call it done enough, maybe revisit in a few weeks.  But it didn’t work, too slow. And then cross compiling and C felt workish, especially the starting over part. I actually had some things working in Python. I fought the evil of Linux video drivers. I learned about computer vision libraries too. It was fun in Python.

It was less fun in C. Though, realistically, I haven’t gotten to do much C, mostly build nonsense. But SimpleCV looks friendlier than OpenCV.

Imagine my disappointment to read that I can only expect ten frames per second in the C+OpenCV version. I don’t know how I missed that. It seems impossible. There is rasppivid video that is 30 fps, why can I get to something like 25? Oh, I know there is hardware acceleration and blah. blah, blah. But I want it. I want it more than they do. (Hey, you did read my Guardians review, right?)

So now I’ve found a different Python package, one with better Pi Camera integration. It is even linked from the Raspberry Pi Camera page. (Was it there before and I missed it? The idea of that makes me feel slightly insane. I looked around A LOT for Pi Camera stuff before deciding to leave Python).

The Camera Modes documentation shows some high frame rates.  The text later talks about all the interesting ways users can mess that up. And there is a section for rapid capturing and processing though I wasn’t clear that I could display them too. It would be interesting to try.

Ok, I think that, yes, I am going to restart the project but back to Python. All the paths are frustrating. But Python has the most potential for amusement and the chance that I’ll get beyond fighting tools and back to playing with gear. I hope.


h1

Here’s how you can’t do it too!

August 7, 2014

I just cross compiled an application for Raspberry Pi: camcv combines the Pi’s camera program raspivid with OpenCV.

It took hours and hours. Not just to build the cross compilers (though that did hours) and figure out cmake and figure out what code I needed, it took hours of tweaking and fiddling to make it work.

I suppose now I’m supposed to write up how I accomplished it, so you can reproduce it, glossing over the tricky bits and making it sound like a walk in the park.

First, I must give credit to

Well, and to be fair, I’m still at Step 3 of OpenCV and Pi Camera’s instructions (of 7 (and a half)). I finally got the program to compile but I have a new Raspberry Pi board and haven’t even powered it on. Oh heck, if I’m reading step 4 correctly, I haven’t actually managed to pull in OpenCV.

I had this neat plan for what to do with the Pi, a camera (two maybe!), and a small display. But I’ve been so battered by compiling something that already existed and isn’t even really what I meant to compile anyway.

I find that many Linux projects have this exponentially expanding scope. My initial initial plan was to play with the camera in python using the actually pretty simple SimpleCV computer vision tools. But it was horrifically slow (a known issue to people who have tried the python and camera but a new issue to a newbie like me).

Worse, I don’t know cross-compiling has been truly worth it. Is multiple hours of setup worth many times two minutes of recompile time? Also, the RPi Compute doesn’t have an Ethernet port so it isn’t as easy to set up a tftp that would all my device access to the cross compiled executables without even a scp copy.

So I’m not going to give you the “here’s how I did it”… I’m not even sure how to post my trees. And I went through so many strange turns, I’m not sure my results will be useful (“and then at step 1123, spin in your chair, clockwise three times, the next cmake .; make instruction will then work”).


h1

My checklist for debugging insurmountable issues

June 21, 2014

I listen to the Amp Hour podcast. Last week, they were talking about ways engineers fail and about checklists as a way to be more disciplined in avoiding preventable errors.

I try to learn from my mistakes so I do have a checklist of sorts when I reach the “it’s all broken and never, ever going to work again” stage of debugging. Of course, when I get to that point, the symptoms are usually different. Still, some parts of the path are relatively common.

1. Having you tried turning it off and back on again?

It is a joke, a very well seasoned joke. But it is only funny because it is so horribly true. This isn’t a good way to debug a horrible problem but it does provide the circumstances the problem happens under. I often start from scratch to reproduce issues because there is often a clue in the process. So, turning it off and back on again is a way to make sure that I start from a well-understood starting point.

The next questions:

Really? Are you sure?

But these are going to follow most of these checklist questions. As embedded system get more complicated, it is pretty easy to turn a part of the system off but not all of it. I don’t usually go from no-power-to-my-desk, I almost always start with my computer on. But sometimes, turning off all power is necessary (including restarting the debugger).

2. Does it have power?

This is different than the previous in that the “it” refers to all the things that may be broken: the processor, the debugger, the sensor or actuator, the level shifters, everything. This step usually requires a voltmeter (and is related to #5).

3. Is it running the code you think it is?

I sometimes have two or three code bases. If my development environment is pointed to the wrong one, I could easily be compiling over here but loading the image from over there. Or possibly, if the load process is difficult, I may think I’ve loaded the code and somehow missed a step.

I’m working on a big system now, a monitor of another system. When I compile the code, it goes through four machines before it gets to where I can try it out. The possibility that I typed cp instead of scp (or forgot the ending colon!), well, let’s just say it happens more often than I’d like.

This is the reason to have build numbers. But if you are really, really sure it is running the code you think, change something about the output and reload. Make sure you see the change.

4. Did you read the boot and debug output?

I write error logging features and always want a serial debug output. I love power on self tests. However, once the system is working, I stop looking at them. But sometimes, if a cable has loosened or hardware has failed, the system will tell me. But only if I am listening.

5. If it used to work, what changed?

Nothing changed, of course. It just stopped working. My minor code change could not possibly have caused something so catastrophic.

I’ve heard that. I’ve said it. That doesn’t make it true.

If nothing changed, then run the old code. If it fails, well, that’s interesting now, isn’t it? If it succeeds, well then, stop saying nothing changed, something obviously did.

This does require frequent commit to version control, to get back to a last-known-good image. But you were doing that anyway, right? And then you can binary search to determine where the error crept in.

Note that if the code change doesn’t explain it, compare the map files (even the binaries). Realizing that something crossed a boundary may give you inside. Oh, also, the makefile (or project file) may have changed: optimizations can have big ramifications.

6. Is there anything interesting in the map file?

Like many embedded engineers, I find the map file to be a bit of an illegible mess. Happily, I’m not afraid of them anymore. There is an amazing amount of information in the map file. And it provides a different perspective on the code, sometimes it will jog my memory.

7. Can you prove it is hardware?

Of course, at this point, it probably is. But you know hardware engineers, they can be feeble. They need proof. So what kind of proof can you offer? How can you break it down to show it cannot possibly be the software?

Seriously, I have had the privilege of working with some phenomenal hardware engineers. It is seldom hardware (but not never). The process of proving it is hardware is a good part of debugging. Plus, if you can make the difficult error repeatable for the hardware engineer, they’ll probably take you to lunch for making their jobs easier.

8. Can you explain the problem to another engineer?

When I tutored intro to CS, I asked people to explain their problem to a teddy bear outside my office before explaining them to me. I usually listened in. However, at least 50% of the people thanked the bear and left without talking to me. Ok, probably only 20% thanked the bear but most walked away because they never actually needed my help. They needed to get their thoughts in order, to explain it to themselves.

I do that now, talk to myself. Sometimes I try to explain it to a trusted colleague (or a junior engineer) in email, trying to figure out what questions they would ask me so the explanations is really good.  Occasionally, I even send the email after all that, if I still can’t figure out the problem.

9. Did you use the single line if again?

When I saw Apple’s goto Fail bug, I completely understood.  I avoid unbraced if statements because one month, I tallied up my most common coding mistakes and found that unbraced if statements caused a disproportionate number of my bugs. I vowed never to use them again.  Since this is a known failure point on my part, it makes my checklist.


h1

Fuel gauge for batteries

April 16, 2014

Lithium polymer (LiPo) batteries are strange beasts. I can’t simply measure the current voltage and tell you how full it is. (You can on throw-away AAs.) Worse, a nearly-full battery and a nearly-empty read about the same voltage until it become really empty and the battery dies.

Determining the LiPo battery’s state of charge requires an algorithm that monitors the battery over time and over a few charge cycles. The simplest way for me to do it for the are-you-ok widget is to buy the monitoring in the form of a small board: the LiPo Fuel Gauge.

However, while not adverse to reading datasheet, I just wanted to plug this board into my system and have it work. I did read the example code: it reads the percent from a register and sets up an alarm-interrupt I don’t care about.

I should have been more suspicious when my full battery read a state of charge (SOC) that was in the 30,000s but really, I didn’t care the actual number as long as I could see the power go down over several days. Except, with deep sleep working, the power is taking much longer than several days to go down. Last time I read the battery, it said 18664. Reading the voltage with a DVM showed it to be very high.

Then I broke that battery’s wire so I need to switch to another module (a very small one this time so I can check the fuel gauge better). Also, this time I’m going to read the datasheet, to get it set up properly.

I figured I might as well take notes here. Maybe note a few things about how to write instructions since that’s also on my mind. The intro starts off pretty good and a line caught my eye in the third paragraph.

A quick-start mode provides a good initial estimate of the battery’s SOC.

Good, that’s what I need. And I already know I can connect to it, at least to read registers. I can probably write registers but I don’t have that code for this chip.  (That’s like 3 minutes of coding and 4 minutes of testing so this isn’t a major deal.)

Next in the datasheet is a bunch self-congratulatory blahblahs that don’t help me solve my problem. Why do they do that? I already bought the thing, quit selling it to me and tell me the good stuff. I get through the “for the electric engineer” tables (those can be important to me but on first skimming, I tend to let the data slide over my brain), then  messy graphs followed by more coy hinting at their algorithm and finally to a section called IC Power-Up.

When the battery is first inserted into the system, there is no previous knowledge about the battery’s SOC.

Since the LiPo’s state of charge depends on it’s history, the first power up is tricky. It goes on to say about how the fancy-schmancy algorithm will converge with time. This was what I was depending on before (and about where I stopped reading the datasheet before). Eventually, the fuel gauge figures itself out, after a few charge and discharge cycles. Of course, if you are talking about months, then that isn’t so useful.

I want a way to charge the battery fully (because the charger says it is done and it have been charging for several hours) and then tell the fuel gauge it is full. Ideally, that will be covered in the Quick-Start section that is next.

A quick-start is initiated by a rising edge on the QSTRT pin, or through software by writing 4000h to the MODE register

Yay? Ok, so now I know how to go into quick start mode but what does that do? It doesn’t tell me. This is why I hate reading datasheets sometimes. It is like talking to a recalcitrant four-year old.

Moving on, maybe things will become clear if I keep reading. The next section is ALERT Interrupt. I don’t want that (not enough pins on the Electric Imp, maybe I could use pulldowns to double up the wakeup pin but that seems too much like work; I don’t mind polling the fuel gauge every hour since the unit needs to wake up and check-in to the server anyway).

The next section is on Sleep Mode. That should be interesting but since I can’t kill batteries, I haven’t done the last few power optimizations: put this and the accelerometer into sleep mode when they aren’t needed.

Let’s see, I can reset the fuel gauge, as though I power cycled it. Whee. (That was an unenthusiastic whee in case you couldn’t tell from the tone.)

Now for the Registers section. As a software person, this is the section I usually skip to. If this datasheet was a walnut, this would be the delicious meaty core.

Usually.

The SOC Register really should be giving me a percent full.

Units of % can be directly determined by observing only the high byte of the SOC register. The low byte provides additional resolution in units 1/256 %.

Ok! So my last reading was 18664, in hex that is 48 EB. Looking at only the high byte hex 48 equals decimal 72. My battery is 72% full. Look at that, it makes sense now.

On April 8th, my reading was 24839, in hex that is 61 07. So hex 61 is 97%.

Essentially I’ve been reading it wrong. To be fair to my previous self, I did look at the figure that showed how to read it which says something different than the text. (Different and implausible but I know why I decided I could just read the 16-bits and concatenate them together.)

This is an easy fix to my software. Where the code used to have

local tmp = (data[0] << 8) + data[1];

I modified it to

local tmp = data[0];

As I only care about the top byte.

Well, while I knew I needed to fix the output issue, the information was decreasing reasonably as I discharged the battery, I know there was just a units or conversion issue. That isn’t why I’m reading the datasheet. I need to know how to tell it that my battery is full. But I should only do it in a manufacturing mode or something, definitely not on every boot or even on every power cycle.

Happily, the next table is about the MODE register which mentions the Quick-Start command. That references the “Quick-Start description section”, what I read before that mentions there is a Quick-Start mode but not how to use it. Searching through the document for Quick-Start leads to nothing.

The MODE register section says the only valid setting is the quick-start setting. I feel like I’m reading an Escher print turned into words.

Ahhh, the version register is next to be described. What could possibly go wrong? Well, for one, it doesn’t tell me what to expect. I read the register and get a value. Is it a good value? Many (most!) vendors suggest what to expect, reading the version register (or whoami) is a great way to verify that I’m communicating properly with the chip. Alas, not for this IC monstrosity. (Ahh, it isn’t that bad, I’ve read far worse datasheets but this one is remarkably easy to pick on.)

I mean, in the next section, it goes over the CONFIG register (which incidentally is where the sleep mode is set). There is a bit in CONFIG called X (Don’t Care).

This bit reads as either a logic 0 or logic 1. This bit cannot be written.

I suppose it is my scotch-and-ice-cream dinner or the last nine pages of nonsense, but this statement strikes be as funny. “This bit cannot be written”, wanna see me try? Because I can write it. The IC may ignore it but I can so write it if I want to.

Next there are some applications of this chip, how to use it for multiple LiPo cells. That’s all very interesting but actually not.

Then there are several pages describing the communication method (two-wire so they don’t have to license from whoever holds I2C’s patent, how can you patent such things?). I don’t care about this as I have that part working.

And then the end. It includes an address only about five miles away. I want to go and ask them to explain to me if there is a way to tell their chip that the battery should be pretty full since I just finished charging it during my hokey manufacturing process.

Instead, with the data format fix, I’ll just plug in another battery and see if it is recognized as full and discharges normally. It is supposed to converge, might as well let it.

And the next time I see a MAXIM part, I will (once again) read the internet-supplied example code and not bother with the datasheet until I absolutely have to. Though, I’d still rather buy MAXIM than Infineon parts.

But that’s a separate rant, for another day.