h1

Have you met my friend Maxwell?

May 11, 2014

I love the manatee. But I’m about to get busy and I want to finish the tutorial before things come crashing down. And Elizabeth has been busy so… in the interest of taking away self-imposed obstacles, I moved forward on the are-you-ok plushie version. Don’t fear, the manatee (or maybe it will be a narwhal) will be back! Just not today.

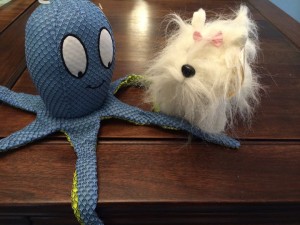
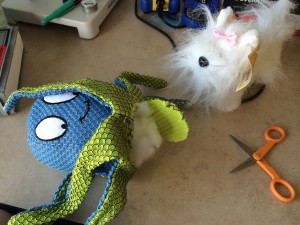
Friday, I went to Target, looked around in their toy aisle for a suitable stuffed animal to disassemble. Then in their dog toy aisle. I figured the dog toys will have squeakers and my electronics can fit in that area (since, of course, I’d remove the squeaker). I came home with two items.

MaxAndDoggie

The octopus is a dog toy. The dog is a human toy. I’m sure this makes sense.
Surgery1Is it mean to make the other one watch? 

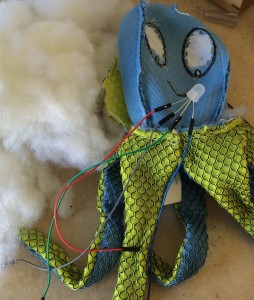
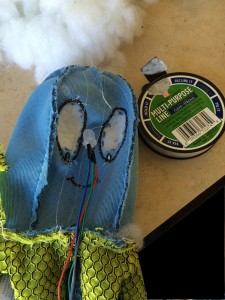
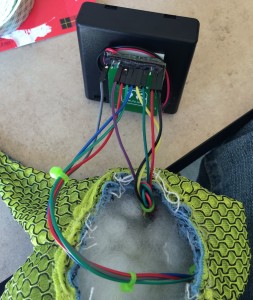
The next step was to remove the stuffing, remove the backing from the eyes so light can shine through, then affix the LED and accelerometer.

insideout

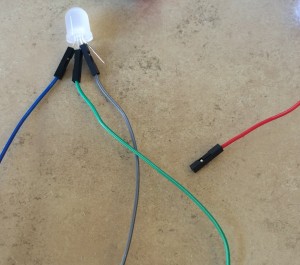
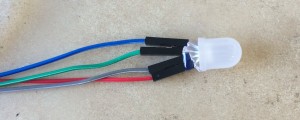
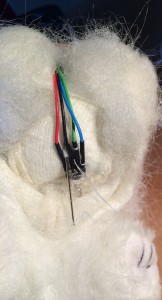
I’m a little worried about my LED.  Either I haven’t been consistent wiring up blue and green or they randomly change on a per-LED basis. (Ok, I am using two varieties of LED so it may be that.) That is wired according to the datasheet. But then when I wire the board, I end up needing to swap the blue and green. Sometimes.

Anyway… that is just to show the wires. The next step is to clip each one (leaving the others with their colors so as not to get confuse). The goal is to clip as short as possible but no shorter. So aim for three snips per since too-short is bad but too long isn’t.

clipLEDLeads

Then hotglue it all together. (CUE: Foreshadowing music.)

hotglueLED

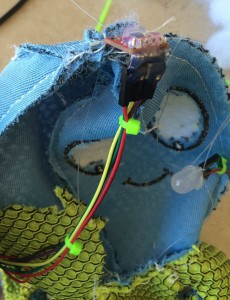
I attached the LED with fishing line, trying to keep it centered on the face but a little free floating.

affixingTheLED

The fishing line is coiled around the LED, maybe a dot of hotglue, then tied at the head, and threaded through at the bottom. With some force, the LED can be shifted up and down but it stays where I leave it. I want the LED to stay where I put it but also float in the stuffing.

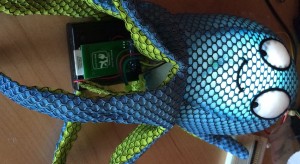
puttingOnTheAccelerometer

Next goal: when you pat the head of the octopus and the accel fires. Happily, the accel has two mounting holes. I used those and more fishing wire through the seams of the head. I also, characteristically, hotglued the metal bits and the cables on to the connector. Think of hotglue as the pauper’s potting substance.

Intelligent people would test all the electronics at this point. You know, before adding stuffing. But, of course, do as I say, not as a I do.

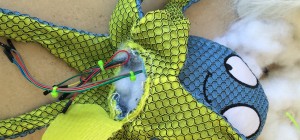
stuffingMax

Some stuffing, in the same role as screws in other projects, is expected to be leftover. They overdesign these things anyway.

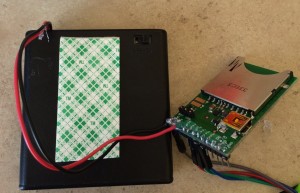
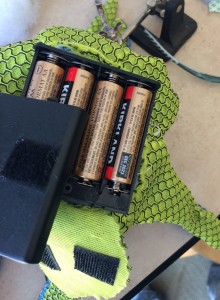
Now, add batteries! I need to have a way for the user (the elderly neighbor) to change the batteries. And I need to have a way for the caregiver to do the annoying-as-all-getup BlinkUp to send the WiFi SSID and password to the Imp card. And yet we also need to have it all look nice and stay in place.

doublestickTapeAndImp

My only advice is to try it out a few times before making any decisions. There were many ways for it not to work and only one or two that it was possible. Double backed tape (the slightly foam-like stuff) is very useful, for those spots where hotglue isn’t.

finalBitsOfHotGlue

Finish the wiring, add hotglue, stick to the double back tape. Stand on battery box on end to show off hotglue, not realizing the sense of vertigo that might lead to.

Really, you have to test him before buttoning him up. Really, really.

glowingWithGuts2


Now, add some velcro to the battery compartment. Then to the flap of fabric on the bottom.

velcroBatteries

Shove it all into the plush body. Nicely of course. Possibly adding a bit more of that stuffing so there aren’t any lumps due to the electronics.

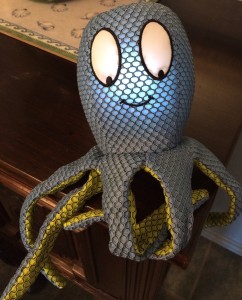
Put him somewhere that you walk by often. Pat him. Mine is a little slow to light but it is such a happy light that it is worth the wait.

maxwellHappyToMeetYou

Ok.

Now, this all looks pretty good, if I do say so myself.

But you maybe are thinking “well, these are instructions from an expert” but here’s the thing: This is the first time I’ve ever modified a plushie to take electronics.

Sure, I worked at Leapfrog, but they had real fabricators (they had the first 3d printer I ever heard of!). So. If you are thinking this is too hard, go out and buy a $5 dog toy and try it. I was pretty shocked at how not-hard it was.

Or you can do a $4 person toy.

doggieHeartLED

You didn’t think the dog was going to escape unmodified, did you?

This is plain thread, sewing the LED into the inner lining of the plush body (don’t want to see the stitches on the outside). I decided the doggie’s heart should light up. And I’m going to have to use 3 AAs or 4 AAAs to fit into the diminutive body, so it will need its batteries changed more ofent.

Of course, I just put my last accel (and Imp) into Maxwell so it will be a little bit before the fuzzie dog gets the rest of its gear. I should go push the buy button on Sparkfun. I am excited about the high potential for cuteness from the fuzzmonster.

Even without the hardware, now I can continue the tutorial. (Or go outside and play before the heatwave next week.)


h1

Letting things fall into place

May 3, 2014

A few weeks ago, Chris Gammell tweeted a link about Buckminster Fuller’s ego-cide. The short version (and bent to reflect my point here): Bucky determined his ego got in the way, that pride and fear were holding him back. He decided to do as he thought was good and let the universe take care of money.

I enjoyed the article. I thought about it for awhile. I started to wonder if I spent so much time pondering it because it is a neat idea from a guy I respect for his varied contributions to many fields. Fuller has such wonderful breadth, our society values depth when synthesis across fields can be just as interesting. In the end, worrying at it like a splinter, the idea of skirting the edge of bankruptcy to follow his wont, I realized that it reminded me of the movie Field of Dreams.

I’ve always thought Field of Dreams was kind of a dumb movie. I have seen it more than a few times as it was the favorite of my best friend in high school (a person who hasn’t spoken to me since the day we graduated).

In particular, the “if you build it, they will come” part annoys me. I’m a planner. Figure out what you want, figure out how to get from here to there, start plodding, ticking off boxes as you go. Monetization is not critical unless you are planning to feed yourself (and family) from this venture.

So ripping out crops to build a baseball diamond because the ghosts tell you to? Kerrrrazy. Absolutely bonkers. Point for style in execution but negative a billion for not having a plan.

That said, my life is in a strange spot. I’ve got some paying work from past clients but it is not a full plate (and always almost finished except they keep adding things). I did all that work for my IoT talk for EELive. I’ve been putting it in blog format, and perhaps managed to sell that as a blog series. It would be neat. And I’m working on the ayok widget which I want to give to a big site (though that one isn’t for sale, it is for personal reasons). But once I do that one, someone might pay me to do more. Building neat things then writing explanations is fun. It is not lucrative, but fun.

Other than my normal “OMG, what if I can never get a job again?” fear that always grates, I’m not overly worried about income. A lot of that is because Christopher makes enough to keep us in kibble. I am looking for a neat opportunity, taking my time about it. Taking a small sabbatical is ok, especially as I’m learning a lot and trying new things.

But if I do stuff because I want to, then someone comes along to say, “hey, that’s neat, let me pay you”,  I’m doing what the movie told me to. And I think that is wrong. Because it always has been.


h1

AAs vs rechargeable and tutorials

April 30, 2014

Ok, I’m writing up the tutorial. Or I would be if I wasn’t writing this.  In the comments for the photo essay, punkiepunkie mentioned putting this together with AAs instead of the rechargeable solution I’ve got going on.

When I started, the Electric Imp drew so much power, AAs seemed crazy to me.

Once I got the battery stuff mostly settled, though, I had trouble killing off even my littlest LiPo. With 150mAh, my littlest Lipo looks like it will last 20+ days.

According to Wikipedia, I can expect 1500 mAh from normal grocery store AAs. I’d need to put two in serial to serial to get 3V. Oh, looking at the power section of the Electric Imp’s breakout board description, I  need 3.3V to 17V, so three or four AAs in serial would be best. Lots of power there, probably can go a year between new batteries, at least six months.

I like rechargeable batteries but it definitely adds a lot of cost to my build. If I take out the LiPo charger, the LiPo battery, and the fuel gauge, that makes the build cost $53 instead of $91. (It also makes the build easier.)

There are three different 4-AA holders, all of them $2:

I’m so attached to the fuel gauge, this is difficult. But Electric Imp has a built in voltage meter (hardware.voltage() returns the current voltage in floating point), I was only using the fuel gauge because LiPos are so tricky.

It is hard to get attached to a method of doing things and then try to change. But if I’m going to write a tutorial (I am, I am!), it would be better to focus on the important parts (the Electric Imp parts). I can easily put the LiPo stuff in another file and tell people how to upgrade.

Now I need to redraw my circuit, get a battery case, and take more build pictures. And fix my code. But this makes me happy, it is hard to shift directions but I wouldn’t have known I was making it unnecessarily complicated if punkiepunkie hadn’t mentioned a different path.

I don’t doubt there is goodness in open source (I use Wikipedia daily) but I don’t think it has every applied so directly to one of my projects. It is neat.


h1

Tootsie’s has the best cappuccino

April 28, 2014

There is a little restaurant in Palo Alto, really on Stanford, sort of near the mall. It is frou-frou food: if you get the fritatta, you don’t get to choose what is in it, you just get to be happy with the deliciousness that comes to you. With Nutella toast.

I love Tootsie’s. I love the cappuccino with its microfoam and deep espresso. I love the tiny donuts (zepole) that make me remember a time I liked donuts. The salads are great, the fruit is fresh, if you are there when they have macarons, get some. I sit outside, courting a pink nose, because the lavender is about to bloom (and the roses are already).

So, though it is a bit closer to her house than mine, it is absolutely no hardship to meet Elizabeth at Tootsie’s to talk about the are-you-ok manatee. It was almost enough to make up for the loss of the mock-up manatee that was so soft and spent so much time in my lap last week.

I’ll be getting a prototype in the next few weeks, probably with the LED and accelerometer sewn in. She’ll have to deal with the boards, though we’ve figured out that right angle connectors would have been better for the next revision. The height of the wires ended up being a bit, um, deformative to the stuffed animal.  I don’t know if Elizabeth is going to try modifying the sewing pattern to put more pocket inside the manatee or if it is going to be a bit lumpy.

Of course, it may not be a manatee. Elizabeth warned me that a whale would be good (for the twitter connection) and a narwhal would look great with an LED on the top of its tooth. I’m excited about all the options.

As punkiepunkie noted in the comments, I did update the agent code in github, cleaning up the comments and starting to indicate what other people are likely to want to change. I’m not done but I am very excited someone is trying this out. I do intent to add comments regarding using AA batteries and non-Sparkfun accels to the device. (Though, I’m hoping to make this a tutorial for Sparkfun. No, I don’t know how to do that. One step at a time… I’ll write up a proposal for the tutorial soon.)

I’ve got a few other things that need doing this week. I was cramming them in since the weather is about to get warm and I’d like to play hooky and go to the beach. But now I’m cramming a bit so I can stop mining salt (short contract) and get back to my gadget.

h1

Manatee photos

April 23, 2014

I usually say that if I am not blogging about my personal projects, I’m not working on them. That isn’t true this week.

I’m afraid that if I take the time to write everything that is bursting in my head, I won’t get to continue working. So I’m going to just put up some photos. These aren’t build instructions, maybe they are just place holders for all the stuff that should (and some that shouldn’t) be in the ayok build notes.

Choosing an LED has been tough. In that pic there are two RGB LEDs, both the same power but the big one (10mm) has a diffuser. The three little ones are red, yellow, green individual LEDs. They are from LilyPad which means they are built to be sewn into things.

Elizabeth made a manatee prototype, including the diffuse LED as a nose and the smaller three as buttons.

For the nose, the question of how to attach it to the fabric came up. Hot glue seems to be my solution for everything but that does make fabric feel yucky so I cut out a perfboard. Elizabeth then used the holes in that to build a prototype nose.

But before I show you how she put it together, here is the base-model manatee. The pattern came from cationdesigns.

It sits up unaided (thanks to some sand weights in the tail and lower belly). It is soft and utterly adorable.

But less so when you add an LED schnoze. That manatee body doesn’t have any stuffing but, even so, not the look we were going for.

The button style LEDs are kind of boring. And since they don’t color mix we lose a lot of flexibility. (All GPIOs are the Electric Imp are used!)

Using conductive thread seemed neat but the interface between pins and wires is not easy. To get the LEDs to light, I ended up knotting all the plus and all the minus sides.

Of course, the thing the thread likes to do most is make knots so that part was easy. I wasn’t thrilled by the look or the electronics side of those buttons.

Putting the tummy in the empty cavity of the body looked nice but that isn’t exactly realistic, the LED can’t just float around in open (deflated) air.

Elizabeth suggested that since we are using a double layer fabric, we could put it between layers . So I unraveled some of her work and shoved it in a newly opened seam in the back.

With the LED in between the two layers of fabric, t gave a nice glow. We are going to try that some more, to give it a tummy glow. I hope that works. It is better than our fallback plan of making the big diffuse LED into some sort of tophat.

The new manatee model also came with a pocket for electronics so we could make things fit. But before we see that, let’s look at the electronics build.

First a parts list in graphic form. This is also in a SparkFun wishlist.

Next I tried to show how things would get assembled. I don’t think I want to do a step by step assembly. The soldering isn’t too tough… But here is what I took while I built it.

First attach headers!

Next, attach red to ground and black to power. Sigh, that is really what happened in the next pic.

I figured it out two days later when the fuel gauge would not work, not even after I fixed its I2C lines. So, maybe this pic won’t go into the instructions.

I need an extra set of I2C pins and another ground pin. I devised this stupidly complex way to go about it involving another breadboard.

I’m not sure how to explain that you can follow this tutorial even if you solder like a drunken sailor. In high winds. Also, you don’t have to do this because you don’t need all these pins that I thought you might want.

Happily at this point we can go back to the manateee. Which I’ve named Hugh. At least this one is.

He’s got a pocket in his butt. This is what needs to fit.


From another angle…

I have more electronics than will fix, though it isn’t too far off. The problem comes from using up-down headers. With right angle headers, this would have worked better. So do I go back and re-do it with right angles?

Because while I jammed everything in there, it appears that Hugh has some unsightly wires coming from his, um, backside.


Ok, this one I took for twitter because I was getting Hugh’s Electric Imp to work. I found a short with the I2C connection (bad solder joint) and then the fuel gauge ground/power swap.


There are some software oddnesses with running two Impees from one account. It took me awhile to get it running. I’m still not sure how to differentiate between the two units (though I’m pretty sure there is a way).

Having gotten it working, I took some pictures today to help explain the wiring. The power subsystem could all be be stuck together: hot glue!

Actually, I wanted that foamy double stick tape but couldn’t find any. Note that only two sets of wires go out of the frame: I2C SDA (green) and SCL (yellow); power (red) and ground (black).

Those go to the Electric Imp board. Two bundles of wires then come off the Electric Imp board: the LED and the accelerometer. The LED has a red (Imp pin 2), green (Imp 5), and blue wire (Imp 7).

The LED pins are:

  • the longest is ground (black)
  • the short one next to that is red
  • the remaining inside one is green
  • the last one, outside, opposite red is blue

The accelerometer has power (red), SDA (green) , SCL (yellow), (nothing), Wakeup (violet), and ground. These all go back to the Imp board.

Finally, the un-taped, un-hotglued ball of wires on my desk.

So you can see, progress is being made.

The second set of electronics work. I have enough drawings and pictures to describe how to do the build (if not enough to do the stuffed animal). The code is working though I have some tweaks (multiple users need different names, handle email, and separate test from real code then comment it).

But Elizabeth is getting this set of electronics this weekend so expect another manatee soon (and maybe another set of electronics).