A new set of questions
April 14, 2014My are-you-ok widget is working pretty well. With some help from the folks at Electric Imp, I got the system deepsleeping. Now I can’t calibrate the fuel gauge because I’m not discharging my battery fast enough. (Problems like these, I can fix!)
Elizabeth sent me a picture of the prototype manatee plushie. It is adorable. Thus, we are getting closer to creating a second, much cuter unit. This leads to an entirely new set of questions.
First, Elizabeth warned me that she told her sister about the project. Her sister, while disliking the cuteness factor of a plushie, has apparently told many other people, generating interest. I was amused that Elizabeth seemed concerned about her own lack of discretion.
Remember, Elizabeth and I did a podcast about the idea. And I’ve been posting here, the code is on github. The goal is not discretion. So what is the goal?
My goal with this project is to build instructions so anyone can build the system. The whole device will cost about $100 and require a bit of soldering (I don’t see how I can get around that), but it is all soldering headers or big wires into holes, nothing too arduous. The instructions will include the code, along with places that require modification (and examples for the different options). It isn’t intended to be a kit that a novice, non-technical person can put together. But anyone who reads MAKE magazine or has every held an engineering job should be able to muddle through.
I don’t know what I’m going to do with those instructions, I’ll let you know when I figure it out. Actually, I’ll probably post proto-instructions here as I go along, trying out different things.
The first step of the instructions will be a parts list. Happily, that one is easy, I created a public wishlist for this project on Sparkfun. Next, I need to describe how to solder this together, that’s easy enough, though the wiring is not exactly trivial. (Note: I do want the reader to have some perfboard and some wire, I’ll need to note the assumptions in the instructions.)
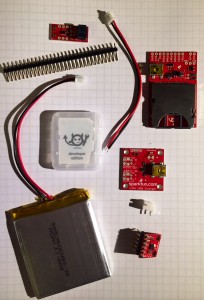
I’m thinking about building unit #2, documenting it for the instructions. Here, have a picture of the kit as ordered:
The more interesting parts come after soldering. If I set up unit #2 to work with my Electric Imp, will it always belong to my account? Or can I transfer it later? Right now, until the code is settled, I want it to belong to my Electric Imp work space. But for the instructions for other people to follow, I don’t want that to be true.
I shot an email over to an acquaintance at Electric Imp, asking about transferring accounts. We’ll see what he says. In the meantime, I can use my current Impee (the SD card looking thing) in the newly built hardware. Once I’ve built it.
As I think about how to give this to Elizabeth, I’m finding more questions- is there one agent per Impee? Or does this agent cover multiple? I hope the former though it would mean replicating code. With the latter, I’ll need to name the Impees better and figure out how to store per-Impee configuration.
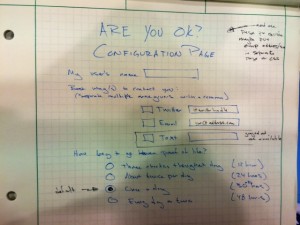
I haven’t worried too much about configuration. I sorta plan to do it via an HTML web page but I don’t have a particularly well thought out plan. I sketched up a possible webpage but plan to leave that very late in the game. If I’m designing for engineers, they’d probably rather change the parameters in code than have another piece to worry about (ok, that’s how I feel right now, I acknowledge it isn’t true for everyone).
My brain is churning with all the things that need doing, that need considering. I think I’ll go solder parts. That should calm it down and clarify what the next steps are. Though, one of the next steps is to give Elizabeth working hardware, either tomorrow or next weekend. Ideally tomorrow.


Hello Elecia,
I have been following your progress on the AYOK since finding your blog after listening to the Amphour podcast.
I think you have a great idea, and it also serves as a fantastic reference for anyone who wishes to get data across the internet.
I bought an imp after listening to your first AYOK podcast (I came to your podcast late).
My experience of initially setting up the imp so that it did something (anything!) was a very positive one and entirely down to the tutorials at sparkfun (I bought the imp from a sparkfun reseller). I just wanted it to work out of the packet. Which it mostly did, except I had to source a 3 pin header and a jumper for the imp PCB (the same board as you have) so as to have the correct power supply options. Had this been supplied (and if already installed), my experience would have been much better. I also had to source and solder in the header that would allow me to connect the imp into a breadboard. I would have preferred these to also have been supplied and soldered.
The sparkfun instructions and sample code really made the difference. I would still be trying to get the imp to do something if it were not for those. So if you wanted a user wishlist, mine would be,
1. Include everything (including all of the electronics, headers, jumpers, wires and USB cable) needed to build and use the kit.
2. If possible have all of the soldering already completed so that the user only has to link the components together with flying wires (as per your photos)
3. Have very clear and descriptive build instructions, with lots of photos
4. Include all of the agent, device and sample HTML code.
This is just my experience of working with the imp, and maybe something of that is useful to you.
Keep up the great work
PP
Thank you very much!
I’ve been making a few assumptions about wires, headers, and USB cables. I’ll go clean that up a bit.
I have the Imp code on github already, though it needs some documenting (especially the parts someone would modify themselves) and refining.
I will keep your advice in mind as I work on it.